Chasing Lights Controller Circuit Using Relays

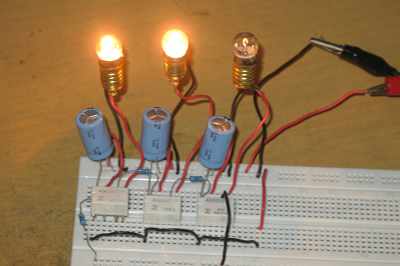
Figure 1. Hamuro Simple Chasing Light Controller Circuit Using Relays
Introduction to Chasing Light
Running lights or chasing light is very attractive for advertisement display. A sequence of on-off at minimum three lamps gives an effect of moving lights. These three lamps then can be extended by paralleling the wire to give long bulbs chain. Modern lighting control system might have micro controller inside for complex lighting pattern, but here we present very simple circuit that employs relays and some passive components. The idea of this circuit is same with running LED circuit using transistors, but here we use relays to controller higher wattage loads.
The Circuit Design and The Schematic Diagram
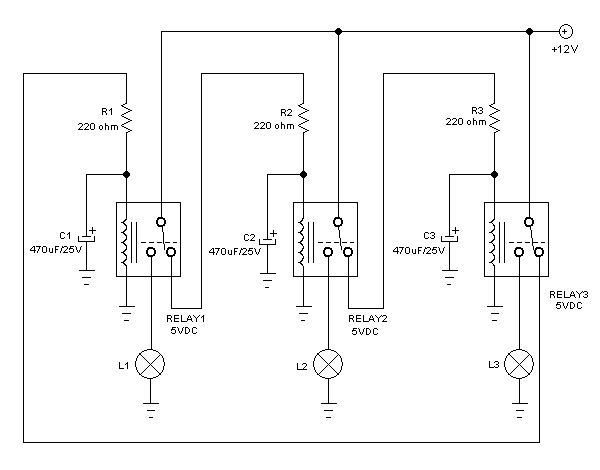
I designed this controller circuit using only three relays, three resistors, and three capacitors, excluding the controlled bulbs. Before explaining about how it works, let’s see the schematic diagram of this lighting control circuit in the figure 2 below. All position of the contacts depicted in the schematic diagram is the normal position, a position of the contacts when no power is applied.

Figure 2. Schematic Diagram of Hamuro Simple Chasing Light Controller Circuit
The relay voltage rating is 5V, and we connect the relay coil to 12V power supply, so we need a resistor for each relay to limit the current and step down the voltage. Each resistor and relay coil’s resistance can be viewed as a voltage divider circuit, so you can choose different resistor values if you use different voltage rating for the relays or if you use different supply voltage. The resistor is not only act as voltage divider, but also as current limiter for the capacitor charging. Without this resistor, the timing of cycle will be undefined since the charging will be very fast and the relay contacts will be overloaded with surge charging current. Note that you can’t theoretically use relays with the same voltage as the power supply since it means you can’t use the resistor, but practically you can use it! We know that almost all relays will works beyond the rated voltage, means that a 12V relays will start getting activated below 12V and can tolerate over 12V voltage. Find yourself the real activation voltage if you use 12V relays for 12V power supply, sometimes it ranges between 8-10 volts, just apply a variable voltage to the coil and find the lowest level when the relay get activated, and compute the series resistor to get slightly above that point when connected to the 12V supply.
How The Circuit Works
If we look at the coil to supply connection, we will find that the power for each relay coil is connected through the contacts of the other relays, and when a relay get activated means that it disconnect another relay. At the initial condition when all relays are inactive, then all coils are connected to the supply and begin charging each capacitor.
- At eth first time the power is connected, all capacitors look like they were racing to get the first in activating the relay. When the voltage of one capacitor reaches the activation level of the relay (RELAY1, let’s say C1 win the race), then the relay is activated and the lamp (L1) is turned on, and it deactivated the next relay (RELAY2). The deactivation of RELAY2 cause the activation of RELAY3, and the activation of RELAY3 cause the deactivation of RELAY1. During the first cycle, the RELAY1 is kept getting activated for some period until the C1 loosing the charge and turning off the RELAY1 (the end of the first cycle). At this first cycle, L1 is turned on, L2 is turned off, and L3 is turned on.
- At the end of first cycle like has been explained above, the RELAY2 is get activated, and it cause the RELAY3 get deactivated and RELAY1 get activated. This second cycle is kept by C2 before it loose its charge to keep RELAY2 active, L2 is turned on, L3 is turned off, and L1 is turned on.
- Finally, the third cycle, using the same propagating effect, L3 is turned on, L1 is turned off, and L2 is turned on. After the third cycle then the system will get back to the first cycle.
We can see that there are two light bulbs that get turned on in same time, while one other bulbs get turned off. The sequence of turning off the bulbs make the effect of moving light. The timing of the cycle is determined by the value of the capacitor, so you can select higher value for slower run and smaller caps for faster run. See the running light action in our Youtube video channel below, then try it at home!
Hi can this also be done with timer relays?
Because we have 24v dc relays and some 24v timer relais