Arduino HM-936D Soldering Station Controller Development
A. Introduction: The 936 Soldering Station Series in The Market
With the popularity of specific brand’s soldering station labeled with 936-series, many manufacturers (mostly Chinese companies) make benefits by producing the counterfeit products with the generic names “936 series” soldering station. It is a good things that their parts are widely available on the online marketplace, as shown in the Figure 1. Whether the product design of the original has a registered patent in any countries or not is beyond our discussion, but the availability of many parts that comes from many manufacturers bring many benefits to customers. With the spirit of open source hardware, now let’s design a general digital controller for soldering station that fits with the various available parts from various “936-series” vendors. Let’s call our design of our controller as HM-936D, which can be an identification code reference of our digital control for 936-series soldering station.
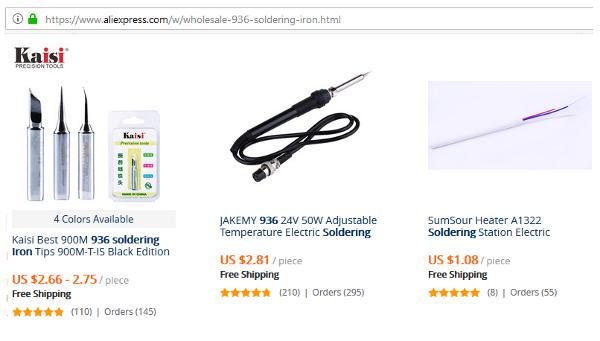
Figure 1. Some 936 Series Soldering Iron Shown An Online Marketplace
B. The Soldering Iron and Its Parts
The soldering iron unit and its parts is shown in the Figure 2. The upper picture show the complete assembly, and the lower picture show its disintegrated parts. It consists of nut (1), tip cover (2), soldering tip, nipple (4), spring (5), heater cartridge (6), heater isolator (7), spring connector (8), heater and sensor leads (9), and wiring terminal PCB (10). The spring is used to connect the tip for ESD (electrostatic discharge) protection, provide a tight electric connection between the tip and the grounded wire.
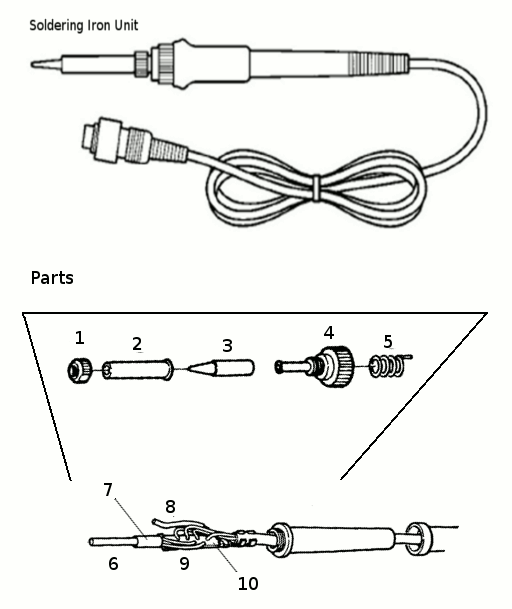
Figure 2. The 936 Series Soldering Iron Unit and Its Parts
C. Heater Cartridge in 936 Series Soldering Iron
With various manufacturer try to make their own 936 series version , we can find different type of sensor and heater in their heating cartridge (part no. 6 in the Figure 2). Fortunately, their have the same shape and size so they are physically compatible. As far as I know from the online reference and some testing on my own heater, there are two types of sensors in the heater cartridge available on the market: RTD (resistance temperature detector) and thermocouple. The same way with the sensor, two different types of heater type inside the cartridge is also found: Nichrome wire wound and PTC (positive temperature coefficient) ceramic. Example of physical look of some cartridges is shown in the figure 3.
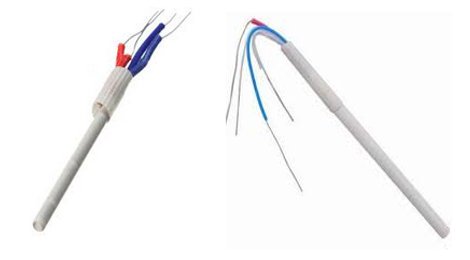
Figure 3. Heater Cartridge
D. Identifying The Cartridge’s Heater and Sensor Type
Before we can design the hardware and the software for the controller, we need to identify the types of the heater and sensor of the chosen heater cartridge. Some cartridge are sold with clear specification in its package, and some are not. The coloring of the wires has different color coding from manufacturer to manufacture, so we need to identify the type first. There are four wires, two wires for the sensor and two wires for the heater. Below is some check list that can be used to identify them.
-
- The sensor and the heater element is electrically isolated, so we can measure the resistance between two leads to find if the two wires come from the same element or not.
-
- RTD sensor has resistance about 40-60 Ohm in the ambient temperature, and it should have no polarity, interchanging the leads should not affect the temperature reading when connected to RTD sensor amplifier. RTD sensor need a bias current to operate, so when connected to a thermocouple amplifier (which has no voltage bias then it should read zero on its output.
-
- Thermocouple sensor has impedance near zero, and it has positive and negative polarity. When it is connected to a thermocouple in reversed polarity the the output will be negative or zero on single supply amplifier. Accidentally connect this thermocouple leads into a power supply will cause a short, blown its fuse, or just activating its current limiter or other overload protection. There is no harm to the sensor or the power supply if it has overload protection.
-
- Nichrome wire-wound heater has resistance 10 Ohms or more in the ambient temperature (25-30) ºC, it will increase as it heated up to the stable resistance that match its wattage when connected to a power supply.
- PTC ceramic heater has very low resistance at ambient temperature, about 2-4 Ohms, but don’t worry it will increase its resistance rapidly if connected to a power supply.
E. Signal Conditioner Basic Circuit for RTD and Thermocouple Sensor Types
An ideal signal conditioning circuit should linearize the sensor response and maximize the A/D converter to its full resolution, so the high precision performance would be satisfied. Fortunately, soldering station doesn’t need such high precision and resolution, so we can design a very low cost and flexible circuit that is suitable for various types of sensors. We believe that even a 10º C error will be acceptable for soldering application, and a simple software linearization mechanism would allow very simple signal conditioner circuit design to meet the requirement. The schematic diagram of the designed circuit is shown in the Figure 4, a very simple amplifier circuit using LM358 low-voltage low-power operational amplifier.
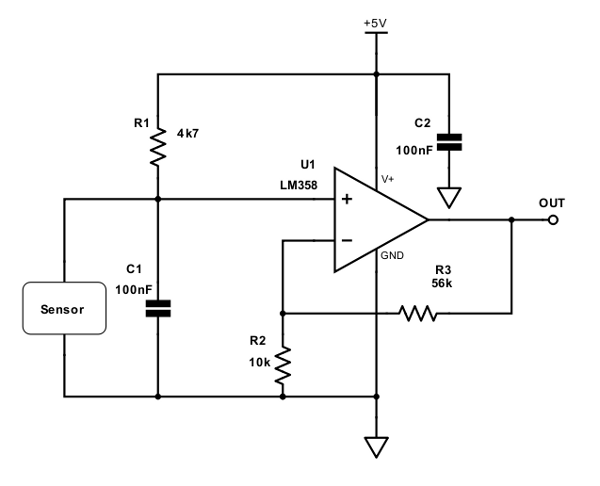
Figure 4. Simple Signal Conditioning Circuit for RTD and Thermocouple Sensor
The main features of the selected op-amp (LM358) is that it works for input near -Vcc, so it will be suitable for single supply operation. The positive output swing is 1.5V below +Vcc at maximum, but the selected microcontroller ATMEGA8 or ATMEGA328 for the main core, there will be internal reference voltage setting for analog conversion that will set the full range conversion at 2.56V (ATMEGA8) or 1.1V (ATMEGA328), so the maximum output swing of the op-amp is more than enough when operated at 5V supply voltage. R1 is the biasing current source for RTD type sensor and should be omitted for thermocouple type sensor. Capacitor C2 is for stabilizing the op-amp, and capacitor C1 is employed for filtering the noise from the sensor and its wiring. The gain of the amplifier is determined by R2 and R3 resistors values:
Gain = 1 + (R3/R2);
With the components values as shown in the Figure, the gain is 6.6, and it will be suitable for RTD type sensor for ATMEGA8 A/D conversion with internal reference (2.45V at full scale). The resistor values of R2 and R3 should be selected based on the employed sensor’s characteristic to optimize the analog to digital (A/D) conversion. Designing a fixed gain with fixed resistor means that the calibration is done in the software, so a trade-off between good resolution and ability to calibrate wide range variation in heater cartridge’s sensor should be considered. If the system’s control range is designed for maximum of 450 ºC for example, R1 and R2 resistor values should be selected to make the A/D conversion results in about 80-90% of the maximum value of the conversion at this maximum temperature to give a room for software calibration
E(a). RTD Resistance-Temperature Response
Resistance temperature detector (RTD) is widely used in heater cartridge application, constructed as winding of pure material wire inside the top of the ceramic rod for protection. It has a specific resistance value at 0 ºC and has specific resistance-temperature transfer function. An experiment to measure some heater cartridge with RTD sensor has been published in an online forum, with one of the result is shown in the figure 5. From looking the plot of several heater cartridge, we can see that the gradient (which express the resistance-temperature transfer function) is similar, around 10-11.5 Ohms per 50 ºC. This gives a transfer coefficient of about 0.2-0.23 Ohms per ºC or 4.35-5 ºC per Ohm. Looking at the different plots at a glance, the temperature reading difference between different cartridges is dominated by offset error, which comes from the different resistance values at 0 ºC.
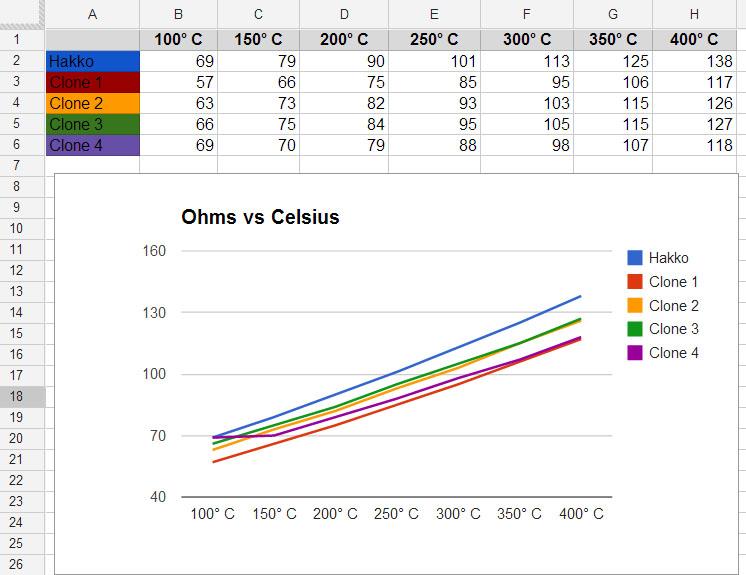
Figure 5. Some 936-Compatible RTDs Transfer Function
Because the low precision requirement of soldering station system, the RTD sensor reading can be simplified by linear formula as follows:
T = (R-A) * B,
Where R is the measured RTD sensor resistance at the measured temperature, A is the RTD sensor resistance at 0 ºC, and B is the resistance-temperature transfer coefficient of the RTD sensor. Using the data from the experiment presented in the Figure 5, we can set an initial coarse value of 50 for A and 5 for B. Don’t too worry about the exact values of this parameters, because the fine values should be calibrated every time the heater cartridge is replaced with the new one, just like the other commercial soldering station systems.
E(b). RTD Resistance Reading for Non Ideal Current Source
When an RTD sensor is biased with constant current source, the resistance reading would be directly proportional to the measured voltage of the output. For the shake of simplicity, the signal conditioning circuit shown in the Figure 4 only use a single resistor as the current source. The output voltage of the sensor (Vo) is the result of dividing the voltage source (Vcc) by voltage divider of Rs and R1, where Rs is the measured resistance at the measured temperature.
Vo = Vcc * Rs/(Rs+R1); //eq.1
Rs = (Rs + R1) * (Vo/Vcc); //eq.2
The sensor’s output voltage Vo can be deducted from the amplifier gain and the ADC (analog-to-digital) conversion reference, but since both side has Rs component then solving this equation (eq.2) analytically would mean transforming it into quadratic equation and solve it with more complex computation. We can avoid solving the quadratic equation by numerical computing, and fortunately, since Rs is very small compared to R1, correcting it recursively give a good approximation even at the first corrective iteration. The correction formula can be formulated as the following:
Rs = (Rs’ + R1) * (Vo/Vcc); //eq.3
With equation 3, Rs is computed using the previous approximation of Rs, i.e. Rs’. At the first iteration, Rs’ is initialized with zero. After we get the first Rs with its previous approximation, we can then correct it further with the Rs as the new Rs’ value. This correction steps can be repeated as much as you wish, but iterating more than 2 or 3 steps is meaningless in regard to the low precision requirement, the low resolution A/D conversion (non optimized with range scaling and shifting in the signal conditioner), and with the uncorrected nonlinearity (neither in the hardware or the software).
E(c). RTD Resistance Reading Error as Ideal Approximation from A Non Ideal Current Source
Much simpler method to reduce the error by voltage divider deviation from constant current source is by increasing the total resistance, so the increase of the RTD is very small compared to the total resistance. For example if use a 10k resistor for R1, then assuming it as a constant 0.5 mA current source, the error at RTD resistance = 200 Ohm is only 2% (200/10,000). Using a calibration method, if we calibrate the system at 400 ºC for example, then the error at this point would be zero, and it will be distributed along the higher and lower temperature, combined with the intrinsic nonlinearity error of the RTD.
E(d). Thermocouple Sensor
Thermocouple temperature sensor is constructed in the heater cartridge by joining the end of two different metal wires inside the top of the ceramic rod. Thermocouple measurement is actually measure the temperature difference between a “hot junction” and a “cold junction”. The hot junction is the measured temperature of the heating element inside the cartridge, while the cold junction is the wiring terminal in the terminal PCB (Figure 2 (10)).
E(e). Thermocouple’s Cold Junction Temperature Reference Error
The thermocouple response depicted in the Figure 6 show 0 Volts at 0 ºC, but note that this response is achieved by keeping the cold junction temperature at 0 ºC. Since the cold-junction of the soldering unit is not stabilized at 0 ºC, then the reading of the output voltage should is not the actual temperature of the hot junction, but the difference between the “hot” and “cold” junction. As there is no additional temperature sensor for measuring this cold junction temperature, the only solution is using an assumption. We can use 30 ºC as the assumption for this cold junction temperature, but keep in mind that the actual temperature would vary depending on the room temperature and the accumulated heat inside the soldering unit (the terminal PCB is located about inside the holding point), and this is the source of the cold junction temperature reference error.
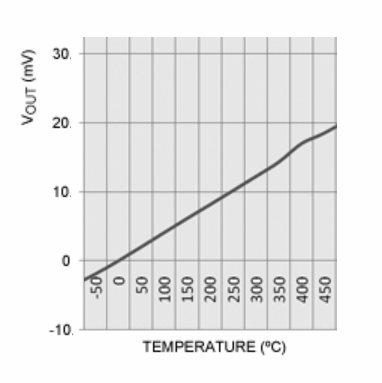
Figure 6. K-Type Thermocouple Conversion Profile
The advantage of thermocouple type sensor is that it has consistent conversion factor which depend on the thermocouple type. For example, my heater cartridge uses K type thermocouple, we can use a constant of 41 μV/ºC to convert the voltage reading into the temperature. The conversion profile is almost linear the range of our interest (100-450 ºC ), as we can see in the Figure 6. Some manufacturers of thermocouple sensor give conversion table for precise measurement, but we don’t need them since it would have no significance compared to the uncorrected cold junction reference error in our simple design.
For the design example, to use a a heater cartridge with K type thermocouple, the selected resistance values for R2 and R3 (refer to the schematic diagram in Figure 4) can be 1k2 and 150k respectively, resulting in a gain of 126. For 100 ºC and 450 ºC , with cold junction temperature = 30 ºC, the produced output voltage
V1 = (100-30) ºC * (0.000041 V/ºC) * 126 = 0.362 Volts;
V2 = (450-30) ºC * (0.000041 V/ºC) * 126 = 2.170 Volts;
For ATMEGA8 with internal reference of 2.56V for A/D conversion, its 10 bit resolution ADC will produce
V1 = (0.362/2.56 * 1024) – 1 = 143;
V2 = (0.362/2.56 * 1024) – 1 = 867;
The total steps for 100-450 ºC (350 ºC difference) is now equal to 867-143 = 724 steps, means that the digitized has about 0.5 ºC resolution. The simple rule is that as long as the digitized value can show 1 ºC difference, then it is convenient enough to be displayed for the user.
E(f). Simple Conversion Model from Digital Reading
As previously described, for linear model of RTD and thermocouple sensors, we can rewrite the formula here to ease the comparison:
-
- RTD sensor: T = Tref + Crtd * (R-Rref), where T is the measured temperature, R is the RTD resistance at the measured temperature, Tref is the reference temperature, Crtd is the conversion factor of the RTD, Rref is the resistance at Tref.
- Thermocouple sensor: T = Tc + Ctc (V-Vc), where T is the measured temperature, V is the thermocouple voltage at the measured temperature, Tc is the assumed cold junction temperature, Ctc is the conversion factor of the thermocouple, and Vc is the voltage at Tc
Because both R and V are proportional to the ADC reading (D), we can write a single formula for both RTD and thermocouple as:
T = Tref + C*(D-D0);
where T is the measured temperature, D is the digital reading of the A/D conversion of the sensor’s output at the measured temperature, Tref is a temperature constant as reference, C is the conversion factor of the digital reading, and D0 is the digital reading of the A/D conversion of the sensor’s output at Tref. We can find the right values of Tref, C, and D0 if we know the exact values of the sensor’s parameters and the amplifier gain, but unfortunately we don’t, and a calibration method should be available in the application program to find them.
E(g). Calibration Method/Strategy
As described in the previous section E(f), we need a calibration method to set the correct value of the conversion parameter. Please note that the amplifier gain should be adjustable by means of trimmer potentiometer at the calibration process to enable the ADC converter utilizing its maximum resolution. Now let’s define a calibration method or strategy for this:
-
- First, an initial values of Tref, C, and D0 are selected based on the sensor type. These initial values should be computed based on assumed values of the sensor parameters. The closer the assumed values to the real values the more optimum amplifier gain would achieved during with the calibration process, resulting in better resolution of the A/D conversion.
-
- Run the soldering station at high temperature setpoint within its designed operation range, for example at 400 ºC for 100-450 ºC operation range design.
-
- Wait the system to stabilize its control based on its initial assumption, then measure the soldering iron with a thermometer. The thermometer should show a stabilized temperature with some error depending on the initial values of Tref, C, and D0. Now adjust the amplifier gain by adjusting the calibration trimmer potentiometer so the system will try to correct it until the thermometer show a correct temperature. After this, the user should execute an application menu function to record the actual reading of the internal ADC conversion for the calibration parameter in the next step if needed. At this point, the temperature at this calibration point would be valid, but changing the setpoint to other temperature point might produce some error depending on how close the approximation of the initial Tref, C, and D0. For manufacturer who confident enough to release a soldering product with their specific heater cartridge, they can use a single point calibration with this 3 steps only if their produced heater cartridges have small error tolerance. If not, then continue to the next step to correct the initial Tref, C, and D0 with the second point calibration.
- Set the setpoint to the lower calibration point within the operation range, 100 ºC for example. Wait until the controller has stabilized the iron temperature, then measure it with a thermometer. The thermometer reading will show the actual temperature with some error, now adjust the setpoint until the thermometer show the correct value (100 ºC). After the iron temperature is stabilized at the correct value shown by the thermometer, now the user should execute the second point calibration function to let the system record the displayed value and the internal ADC reading value for the calibration data. This data should be used to correct the Tref, C, and Do parameter so the reading of both second point temperature (100 ºC) and the first point temperature (in the step 2, 400 ºC) would be valid.
E(h). Finding The Initial (Uncalibrated) Conversion Parameters and Applying The Calibration Data
The first problem to solve before the calibration process described in the previous section E(f) can be done is that we have to compute the initial Tref and C from the assumed sensor parameter, so let’s do the math solve it. For 100 – 450 ºC operation range design as an example, with the first calibration point at 400 ºC and the second calibration point at 100 ºC, let’s define and pre-compute some parameters:
- Tmax = 450 ºC, the maximum operating temperature
- Dmax = 1000, The ADC reading at Tmax
- T1 = 400 ºC, the first point of calibration temperature
- T0 = 100 ºC, the second point of calibration temperature
- Ctc = 0.000041V per ºC, thermocouple conversion constant
- Tcj = 30 ºC, thermocouple cold junction temperature,
- Vto = (To-Tcj) * Ctc, thermocouple output voltage at T0
- Vt1 = (T1-Tcj) * Ctc, thermocouple output voltage at T1
- Vtmax = (Tmax-Tcj) * Ctc, thermocouple output voltage at Tmax
- Crtd = 0.2 Ohms per ºC, RTD conversion constant
- R0 = 50 Ohms, RTD resistant at 0 ºC ref
- Rto = Ro + To * Crtd, RTD resistance at T0
- Rt1 = Ro + T1 * Crtd, RTD resistance at T1
- Rtmax = R0 + Tmax * Crtd, RTD resistance at Tmax
- D1 = Dmax * Vt1/Vtmax, ADC reading at T1 for thermocouple
- D1 = Dmax * Rt1/Rtmax, ADC reading at T1 for RTD
- D0 = Dmax* Vt0/Vtmax, ADC reading at T0 for thermocouple
- D0 = Dmax * Rto/Rtmax, ADC reading at T0 for for RTD
Based on the above assumed sensor parameters and some pre-computed parameters, we can then compute the Tref and C using as the following
- Tref = T0
- C = (T1-T0)/(D1-D0)
Using these conversion parameters (Tref, C, and D0), the system is ready for calibration method as described in section E(g). Please note that although we have a plugged sensor with precise parameter (exactly the same with the assumption for computing initial conversion parameters), the system is considered invalid before the calibration process is done because the calibration trimmer potentiometer is not yet set for correct gain. After the first 3 calibration step, now the system will be valid for all temperature within the range only if the initial conversion parameter is computed from the actual plugged sensor. Because there’s practically no mass-production method produce zero tolerance in deviation from the specification, the 4th calibration step should be completed to achieve valid conversion for all temperature point in the range. After the 4 steps calibration is done, we get the second calibration point data, i.e. the error reading on the real T0. There some calibration data that should have been acquired at the end of 4-step calibration:
-
- D1x, the ADC reading of the stable condition at calibration step 3 (T1, 400 ºC)
-
- D0x, the ADC reading of the the stable condition at calibration step 4 (T0, 100 ºC)
- T0x, the displayed temperature reading of stable condition at calibration step 4 (T0, 100 ºC)
From that data, let’s find a new calibrated Tref, C, and D0 as Toffset, Gain, and Doffset. From the actual digital reading difference difference between T1 and T0, which is D1x – D0x, we have to produce T1-T0 temperature difference by from the ADC reading difference, (T1-T0) = Gain * (D1x-D0x), so
Gain = (T1-T0) / (D1x-D0x);
With
Toffset = T0;
Doffset = Dox;
Now the final calibrated conversion formula will be:
T = T0 + Gain * (D-Doffset);
Solved!
F. The Complete Controller Circuit
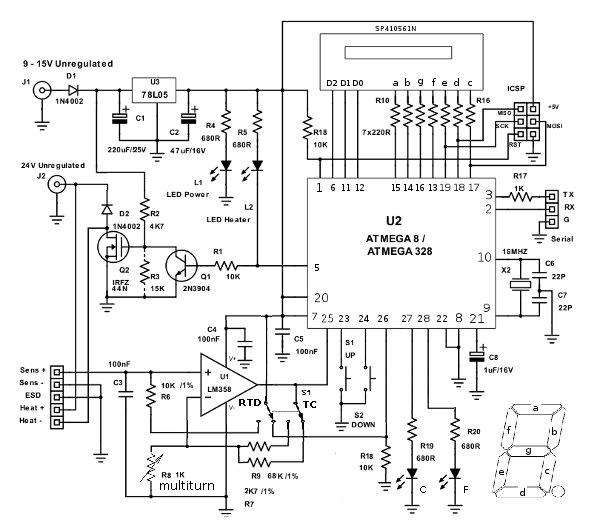
Figure 7. HM936D Arduino Digital Soldering Station Controller Circuit Schematic Diagram
In the Figure 7, schematic diagram of the complete controller circuit is shown. The employed microcontroller is ATMEGA8, and it is also tested with ATMEGA328 for development purpose since there are more Arduino boards available with this chip. For the lowest cost, stick with the ATMEGA8 chip with internal oscillator so there is no need for 16MHz XTAL X2 and the capacitors C6 and C7. Arduino board setting for ATMEGA8 with 8 MHz internal oscillator can be found here: MiniCore board support for Arduino. The 100nF capacitor C5 is employed to stabilize the power supply line when the chip produce a brief current surge for the digital operation. Ideally, there should be separate capacitors that should be placed as close as possible to the analog and digital power supply pins, but as long as we can keep the wiring (from analog to digital power supply pin) as short as possible then a single capacitor close to the analog supply pin should be enough.
F(a). Unregulated Power Supply
There are two separate power supply input for the whole system for supplying the 24V-rated heating element and the lower voltage controller circuitry. The default source for these inputs is labeled as unregulated, means that it should comes from a rectified step-down transformer, but not regulated, and not even filtered. The main reason behind the use of unregulated power supply with transformer and diodes is that its is the cheapest option. Moreover, purchasing or producing a transformer with single or multiple output voltages has no significant difference in term of price or cost. We can replace the unregulated power supply with only a single regulated supply at 24V, but I think the cost would be higher. The problem with the unregulated outputs is that the peak voltage is much higher (1.4x) than the regulated one since the unregulated is rated for RMS (root mean square) power. The employed regulator 78L05 IC is specified at 30 Volts absolute maximum rating (according to its data sheet) but the peak voltage of the unregulated source would be 34 Volts for 24V (rms)-rated transformer, so it would make the regulator IC fails if we use that single unregulated source. Even worse, most transformers mark up their output voltage to compensate losses in their design (a testing on my cheap transformer which rated at 25V/3A results in almost 40Volts!). Other solution to enable using a single unregulated power supply is by replacing the 78L05 regulator with other components of circuitry which can withstand for 40-50V inputs, or dropping the input voltage before the 78L05 by high wattage Zener diode (15 V/100 mA) or several lower voltage lower wattage diodes to distribute the dissipated power, but the total cost should be the most important things to consider. Back to the two separated unregulated power supply, some options using various step-down transformers are shown in the Figure 8.
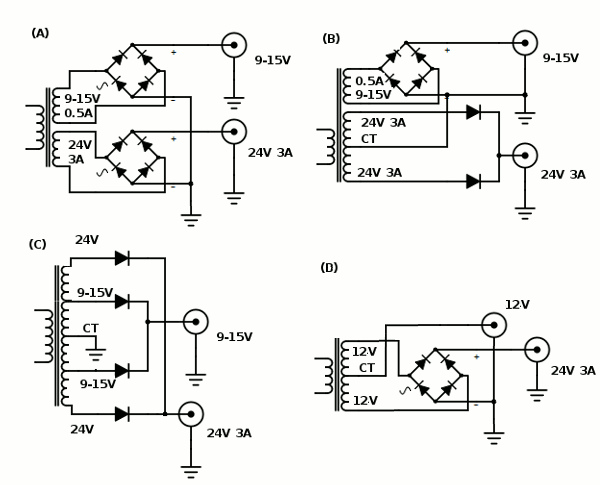
Figure 8. Unregulated Power Supply Circuit Schematic Diagram
The first option (A) is the ideal one we can find or build a custom transformer like this (two separate secondary winding, 24V/3A and 9-15V 500mA), because it has the optimum for winding space to achieve the current performance for the specified voltage while giving the best stability by the separate winding for the low voltage low current output. The second options (B) is likely the more available transformer type in our local store, it is rated for 3A 24V with CT (center tap) but has the separate tertiary winding with smaller amperage rating (9-15V/0.5A). The third (C) and fourth (D) option uses a widely available transformer as well, but the stability of the control board supply can be affected by the failure of the heating element, since any short or current surge in the heating element would drop the control voltage as well. A caution for D option, the low voltage output from the center tap (CT) is only half rectified, so it is recommended to increase the backing capacitor C1 (Figure 7) to 470uF/25V to ensure the MOSFET Q2 would always be driven by the voltage of 10V at minimum for its gate. For all types of the chosen transformer, the R3 resistor should be installed to reduce the driving voltage of the IRF44N power MOSFET if the chosen transformer output is 15V, since its maximum gate voltage is only 20 Volts and the real peak voltage can be as high as 21 V or even more. For development purpose (where the cost doesn’t matter), it is possible to use a single regulated 24V power supply for both heater and control board, and just make sure R3 resistor is installed to prevent over-voltage for the Q2 MOSFET’s gate.
F (b). Signal Conditioner Circuit
Unlike the basic circuit described in section E, the complete circuit implement the signal conditioner circuit with flexible gain and sensor type, accommodating for both RTD and thermocouple sensor type. The current biasing source R6 has been increased to 10k reduce the error of from ideal constant current source deviation. Unlike using fixed resistors for setting up the gain for 80-90% full scale reading at the average cartridge for software calibration, now using the variable resistor R8 (multi-turn trimmer potentiometer) the calibration process is done in the hardware. With the hardware calibration, we can set the gain to give full scale ADC reading as 1023 (digital value) for the expected maximum controllable temperature (450 ºC for example), but down-grading the resolution for 1000 (digital value) at 450 ºC (maximum setpoint) enable the controller to give better control action since the temperature error (that should be corrected) won’t be saturated by digital conversion limit.
The thermocouple(TC)/RTD selector switch S1 is provided to select appropriate gain range for easier calibration, and to connect and disconnect the current biasing source R6 (10k) for the sensor since the RTD type need such biasing while the thermocouple type doesn’t. When the Vcc is disconnected from the biasing resistor, then it’s means that it get connected to the pulled-down microcontroller input pin 26, changing the sate of the pin from “low” to “high”. The state of this pin is the can be read by the microcontroller to know whether the system is configured for TC/RTD sensor. This TC/RTD reading from the input pin is not a must, because we can also set it manually in the operational menu of the microcontroller program. Knowing whether the sensor type is thermocouple or RTD is important in order to select an appropriate values for the initial conversion parameter, so the calibration process defined in section E(g) would produce an optimal values of the gain setting for the ADC conversion.
For the operational amplifier IC (integrated circuit), other LM358 type can be used as long as it has negative output swing capability down to -Vcc, and its positive output swing is larger than the reference voltage for A/D conversion with 5V power supply. The 100nF C4 capacitor is employed to stabilize the op-amp so it should be placed as close as possible to the op-amp chip.
F(c). Heating Element Driver
The heating element is driven by an IRFZ44N Power MOSFET Q2, with its gate is driven from a pull-up resistor R2. A protecting diode D2 is employed to secure the device from fly-back current and voltage generated by the heater’s and its wiring’s inductance behavior. MOSFET almost draw no current to operate since it has very high impedance at its gate, but unfortunately this driving voltage should be as high as 10 Volts to make sure the device is fully saturated, get switched on with very low resistance. Driving it at about 5 Volts would make this device work in linear mode and this will dissipate many power as heat, that’s why this MOSFET can’t be directly driven by the microcontroller pin. I see other type of POWER MOSFET that can be driven by a low voltage (<5V) but this device cost much higher, so it’s not employed in this designs. Although it has very high impedance, it has an intrinsic capacitance that slow down the switching profile when driven trough a resistor, this is why the value of R2 resistor can be very high to make sure a rapid switching, to prevent longer period of exposing the MOSFET in linear working region. The IRFZ44N type has been tested with the circuit for driving 50W/24V heating element in fully-on and PWM mode. The PWM mode is done in low speed (10-50Hz) and standard speed (~500Hz), both with 10%, 50%, and 90% duty cycle. The testing result shows no significant heat is generated by this device (no heat-sink) for all testing modes. Cheaper Power MOSFET with lower on-resistance specification than IRFZ44N type might be used, but we have to test it to ensure it won’t generate excessive heat to avoid additional heat-sink cost.
F(d). Seven Segment Display
For the lowest cost, a three (3) digits seven-segment display is chosen for this controller board. Because all the display pins are driven directly by the microcontroller pin with push-pull capability (ATMEGA8/328), we can use both common anode or common cathode type for the 7-segment display. Current limiting resistors (R10 -R16) is connected to each segment lines. We can reduce the number of these resistors to only 3 resistor if we connect them to the common lines (not the segment lines), but it produces lower overall brightness (as well as the power consumption) and we have to implement charlieplexing method that drives only one segment in one moment. If the limiting current resistors are used to drive the common lines like this, make sure they are driven by MOSI, MISO, and SCK pins, since these pins would have no protecting resistor when arranged to drive the segment lines and the ICSP interface might not work. This display is used to show the actual temperature in normal working operation, showing the current active setpoint setting, or editing value for setpoint and calibration.
F(e). Up-Down Button Interface
The user interface button is implemented in a very simple way, only two buttons: up (S2) and down (S1). To accommodate many function, we can code the software to read many gestures from normal click, long press, double click, press and hold, double-button press, etc. This should be enough for setting up all operation modes from setting up the set point to adjusting calibration parameter. The pin for this push-button switch For hardware simplicity, de-bouncing method should be implemented int the software. The buttons are just connected between microcontroller pins and the ground, so the microcontroller pin should be configured as digital input with internal pull-up for this buttons.
F(f). Programming Port and Serial Port
The provided programming port is the ICSP header, where we can connect to the chosen ATMEGA series ISP programmer (any Arduino board loaded with ArduinoISP sketch should work). After programmed with Arduino bootloader, it can be programmed through the serial port using the Arduino bootloading mechanism as well, but it won’t work until an RTS signal is wired to the RESET pin through a 0.1 uF capacitor to reset the chip for starting bootloader program. To avoid this complicated hack with this board and to keep it simple and low cost by avoiding USB to serial converter chip (such as FTDI or its compatibles), stick with the ICSP port for programming. The serial port is provided mainly for application, so it can be useful for debugging in service and maintenance mode, or providing factory-access for automated testing and calibration. This serial port access should be made available for development, factory testing/calibration, and servicing purposes, but not for end user (who use the soldering station product).
G. Soldering Station Application Programming
For development of a software system with complex processes, using a real-time operating system to manage many tasks is very convenient. Unfortunately, even a small real time operating system (like FreeRTOS for example) requires significant program space for low cost microcontroller like ATMEGA8, so it’s not an option. To ease the development, a simple programming model based on state machine and cooperative function has been developed, and it’s implemented as a simple base class that can be derived to implement various state machine elements inside bigger and more complex system.
Using this programming model for Arduino is very easy, just define the base class and some global variables in the top of the Arduino sketch (as shown in the Source Code 1), then write the descendant class to implement all modules that implement different functions.
[cc lang=”cpp”]
//ARDUINO DIGITAL CONTROLLER FOR 936 SERIES SOLDERING STATION
//Copyright (c) 2018 Hamuro
//GLOBAL VARIABLES
float setpoint=0;
float actualtemp=0;
float setpointedit=0;
float controlsignal=0; //ranges from 0 to 1.0;
//########################################################################################################
//CLASS: statemachine
//this clas is a base class for state machine object
//all the descendant should implement virtual protected run() function and virtual public setup() function
//visit https://www.deeptronic.com/software-design/state-machine-and-cooperative-multitasking-model-simplify-complex-processes-programming-for-microcontroller/
//to get the detail information on how to use this class to implement very simple method for cooperative multitasking suitable for low cost (low resource) microcontroller
class statemachine
{
protected:
virtual void run(){};
unsigned long runInterval;
unsigned long lastRun;
int state;
public:
statemachine(unsigned long run_interval) //the constructor
{
runInterval = run_interval;
lastRun = millis();
state = 0;
}
void execute() //the periodically called cooperative function
{
unsigned long currentMillis = millis();
if((currentMillis – lastRun) < runInterval)
return;
lastRun = currentMillis;
run(); //the protected function that should be implemented by the descendant
}
virtual void setup(){}
};
[/cc]
Source Code 1. Global Variables and Cooperative State Machine Base Class
G(a). Tasks Organization Structure
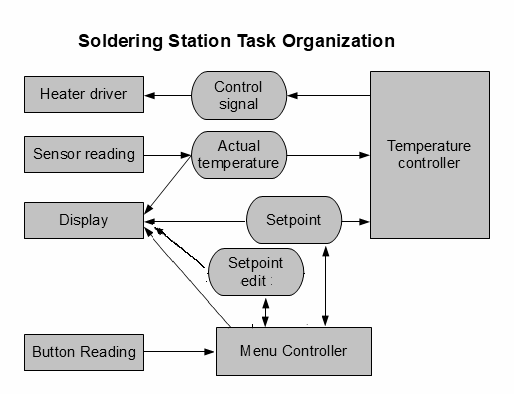
Figure 9. Soldering Station Tasks Organization
The structure of the tasks inside the soldering station software system is shown in the Figure 9. The rectangular box represent a task that will be implemented as single state machine. A box with rounded side represent a global variable that is accessible by all tasks: setpoint is the expected temperature that should be achieved by the controller, setpoint edit is the temporary value to be displayed when setting up a new setpoint, actual temperature is the real temperature of the heating element measured by the heater cartridge’s sensor, and control signal is the actuating parameter to manipulate the power/energy supplied to the heating element through the heater driver hardware interface. As heating is a slow process, the time constant of the whole system response from from powering the heater, heat generation in the heater, heat transfer to the sensor, and the final reading by the sensor is much greater than 1 seconds, it is make sense that the controller is designed based on 10 sampling rate per second.
G(b). Seven Segment Display Module Implementation
Next, the display is the first program to be implemented since it help us to debug the program during development. As an independent state machine, this module run continuously to read global variables and displaying on a 3-digits 7-segment LED. It has three channel actual temperature, setpoint, and setpoint edit; which can be activated by other module (the menu controller) to tell this module which global variable should be displayed. The program listing is shown in the Source Code 2.
[cc language=”cpp”]
//#########################################################################################
//CLASS: ss_display
//this class implement the multiplexing of 3-digits 7-segment display
//INTERFACE:
//call setSetointChannel() to select the input from setpoint global variable
//call setActualChannel() to select the input from actualtemp global variable
//call setEditChannel() to select the input from the setpointedit global variable
const byte segmentpattern[10][7]=
{{ 0,0,0,1,0,0,0 }, // = 0
{ 1,0,1,1,0,1,1 }, // = 1
{ 1,0,0,0,1,0,0 }, // = 2
{ 1,0,0,0,0,0,1 }, // = 3
{ 0,0,1,0,0,1,1 }, // = 4
{ 0,1,0,0,0,0,1 }, // = 5
{ 0,1,0,0,0,0,0 }, // = 6
{ 1,0,0,1,0,1,1 }, // = 7
{ 0,0,0,0,0,0,0 }, // = 8
{ 0,0,0,0,0,0,1 } // = 9
};
class ss_display:public statemachine
{
protected:
enum states{digit0,digit1,digit2};
enum displaychannel{setpointchannel,seteditchannel,actualchannel};
byte val; //the value of a single digit
byte remainder;
int channel;
byte segmentpin[7];
byte digit0Pin, digit1Pin, digit2Pin;
void writeSegments()
{
for(int i=0;i<7;i++)
{
digitalWrite(segmentpin[i],segmentpattern[val][i]);
}
}
void run()
{
switch(state)
{
case digit2:
{
int valbuffer;
if(channel==setpointchannel)
valbuffer=setpoint;
else if(channel==seteditchannel)
valbuffer = setpointedit;
else valbuffer = actualtemp;
if(valbuffer>999) valbuffer = 999;
if(valbuffer<0) valbuffer = 0;
if(valbuffer>999)
valbuffer = 999;
val = valbuffer/100;
remainder = valbuffer%100;
digitalWrite(digit0Pin,0); //deactivate previous segment
writeSegments();
digitalWrite(digit2Pin,1);
digitalWrite(digit1Pin,0);
state = digit1;
break;
}
case digit1:
{
val = remainder/10;
remainder = remainder%10;
digitalWrite(digit2Pin,0); //deactivate previous segment
writeSegments();
digitalWrite(digit1Pin,1);
digitalWrite(digit0Pin,0);
state = digit0;
break;
}
case digit0:
{
val = remainder;
digitalWrite(digit1Pin,0); //deactivate previous segment
writeSegments();
digitalWrite(digit2Pin,0);
digitalWrite(digit0Pin,1);
state = digit2;
break;
}
}
}
public:
ss_display():statemachine(5){} //set the run interval in the constructor
void setSetpointChannel()
{
channel = setpointchannel;
}
void setActualChannel()
{
channel = actualchannel;
}
void setEditChannel()
{
channel = seteditchannel;
}
void setup(byte d0, byte d1, byte d2, byte sa, byte sb, byte sc, byte sd, byte se, byte sf, byte sg)
{
state = digit2;
digit0Pin = d0;
digit1Pin = d1;
digit2Pin = d2;
pinMode(digit0Pin,OUTPUT);
pinMode(digit1Pin,OUTPUT);
pinMode(digit2Pin,OUTPUT);
segmentpin[0] = sa; pinMode(sa,OUTPUT);
segmentpin[1] = sb; pinMode(sb,OUTPUT);
segmentpin[2] = sc; pinMode(sc,OUTPUT);
segmentpin[3] = sd; pinMode(sd,OUTPUT);
segmentpin[4] = se; pinMode(se,OUTPUT);
segmentpin[5] = sf; pinMode(sf,OUTPUT);
segmentpin[6] = sg; pinMode(sg,OUTPUT);
}
};
ss_display ssdisplay;
[/cc]
Source Code 2. Seven Segment Display Module
G(c). Sensor Reading Module Implementation
The sensor reading module read the analog voltage from the signal conditioning out continuously at 100 samples per second (10 millisecond period), but it accumulates every 10 reading to get the average for improving the signal to noise ratio. That means that the the final sampling rate is only 10 samples per second or 100 milliseconds sampling period. A better filtering performance, it is recommended to use digital low-pass filter algorithm running at sampling rate of 100 samples/second, and then down-sample it to 10 samples per second to synchronize with the temperature controller module. A simple method of averaging 10 samples is implemented for simplicity of the example, as shown in the Source Code 3.
[cc language=”cpp”]
//#########################################################################################
//CLASS: ss_sensor
//this class read the actual temperature and assign the value to the actualtemp global varibale
//the sampling period is 10 ms (100 samples per second),
//writing to actualtemp every 100 ms (10 samples per second) for averaging
class ss_sensor:public statemachine
{
protected:
byte sensorpin;
int readcount;
byte thermocouple_mod;
float Toffset;
float Gain;
float Doffset;
float acttempsum;
void run()
{
readcount++;
float D = analogRead(sensorpin);
acttempsum += Toffset + Gain*(D-Doffset);
if(readcount == 10)
{
actualtemp = acttempsum/10.0;
readcount = 0;
acttempsum = 0;
}
}
public:
ss_sensor():statemachine(10){} //set the run interval in the constructor
void setup(int pin, byte thermocouplemode)
{
thermocouple_mod = thermocouplemode;
sensorpin = pin;
acttempsum = 0;
if(thermocouplemode)
{
Toffset = 30; //assume 30 ‘C cold juntion temperature
Doffset = 0; //thermocouple would produce 0V output (so the ADC reading) at hot junction temp = cold junction temp = 30 ‘C
Gain = (450.0-Toffset)/(1000.0-Doffset); //assume digital reading 1000 at 450 ‘C
}
else
{
Toffset = 0;
Doffset = 50*1000.0/(50.0+0.2*450.0); //assume 50 Ohm RTD at 0’C, 0.2 Ohm/’C RTD conversion, and digital reading 1000 at 450 ‘C
Gain = 450.0/(1000.0-Doffset);
}
readcount=0;
analogReference(INTERNAL);
}
};
ss_sensor sensor;
[/cc]
Source Code 3. Sensor Reading Module
The setup for this module require the analog pin number as the first parameter and the sensor type as the second. The automatic reading of the pin 26 ATMEGA8/328 (Arduino analog input 3) is not implement, but it can easily added as an interface method to set the sensor mode if you wish. For simplicity as an example, the conversion parameters Toffset, Gain, and Doffset are directly initialized at setup with some assumption. For the final product, a method for updating its conversion parameter should be added in this module interface, which could be accessed by the menu controller after the calibration function is executed.
G(d). Heater Driver Module Implementation
The heater driver module implement a low speed PWM output. The native Arduino PWM is not used since the ATMEGA8 has no PWM output in the employed pin (pin 25). For ATMEGA326 or other series with PWM3 output, it can be modified to use the native Arduino PWM with analogWrite() function. The frequency of the low PWM output is set at 20Hz, and the resolution is 25 steps, and it should be adequate for 10 sample/second controlling speed. The program listing is shown in the Source Code 4. The heater driver read the input from global variable controlsignal, which ranges from 0-1.0. A zero (0) value of controlsignal means that the POWER MOSFET is turned-off, while 1.0 value means that the POWER MOSFET is fully turned-on. The contolsignal value in between 0-1.0 means that the POWER MOSFET is blinked-on and -off (20Hz) with the duty cycle proportional to the control signal.
[cc language=”cpp”]
//#########################################################################################
//CLASS: ss_heater
//low speed pwm (20Hz) low resolution (25-steps) for driving POWER MOSFET heater driver
//this class read the input from controlsignal global variable
class ss_heater:public statemachine
{
protected:
enum states{waitOnCount, waitOffCount};
int oncounter,offcounter;
int offperiod,onperiod, levelcount;
int outPin;
void setperiod()
{
onperiod = round(controlsignal*(float)levelcount);
offperiod = levelcount – onperiod;
}
void run()
{
switch(state)
{
case waitOnCount:
{
oncounter++;
if(oncounter>onperiod)
{
if(onperiod<levelcount)
digitalWrite(outPin,1);
offcounter = 0;
state = waitOffCount;
}
break;
}
case waitOffCount:
{
digitalWrite(outPin,1);
offcounter++;
if(offcounter>offperiod)
{
if(offperiod<levelcount)
digitalWrite(outPin,0);
oncounter = 0;
setperiod();
state = waitOnCount;
}
break;
}
}
}
public:
ss_heater():statemachine(2){} //set the run interval in the constructor
void setup(int pin)
{
levelcount = 25;
setperiod();
outPin = pin;
state = waitOnCount;
pinMode(outPin,OUTPUT);
}
};
ss_heater heater;
[/cc]
Source Code 4. Heater Driver Module
G(e). Temperature Controller Module Implementation
The temperature controller module is the responsible module for manipulating the control signal for the heater driver. It reads the input from global variable actualtemp and setpoint, generating output control that should be passed to the global variable controlsignal. The example code shown in the Source Code 5 implements a very simple control algorithm, i.e. binary or on-off controller, which compare the actualtemp input and setpoint input. If the actual temperature represented by actualtemp variable is lower than setpoint then controlsignal is 1, otherwise controlsignal is 0. By this very simple method, the actual temperature will be stabilized to the setpoint value. It is well known that on-off controller will produce noticeable instability because the actual temperature would swing back-and-forth arout setpoint value, but it works and is usable for this application. For better control performance, a PID (proportional-differential-integral) controller should be implemented in the final product.
[cc language=”cpp”]
//#########################################################################################
//CLASS: ss_controller
//this controller read setpoint input from global variable actualtemp
//and compare with the actual temperature (global variable actual temp)
//and then generate control signal ang assign it to controlsignal global variable
//the sampling period is 100 ms
class ss_controller:public statemachine
{
protected:
void run()
{
//write your control algorithm here
if(actualtemp<setpoint)
controlsignal = 1;
else controlsignal = 0;
}
public:
ss_controller():statemachine(100){} //set the run interval in the constructor
float value;
void setup()
{
//do nothing
}
};
ss_controller controller;
[/cc]
Source Code 5. Temperature Controller Module
G(f). Button Reading Module Implementation
Button reading module separation would enable much simpler development for the menu controller. The button reading module should be accessed only by menu controller module. It handles the de-bouncing and manage many states for the key input operation. For simple example, the code shown in the Source Code 6 is written to generate “up” and “down” key only, and can be improved to produce more key by adding more states to detect double press (up+down), long press, press and hold, or even detecting double click.
[cc language=”cpp”]
//#########################################################################################
// CLASS: ss_button
// this class manage the keyswitch reading to provide four characters output
// ‘u’: up button
// ‘d’: down button
// INTERFACE:
// reset(): reset the button state
// startwaitkey(): start waiting kypress, should be called when isidle()==1 or iskeyready()==1
// getkey(): return the last pressed key and reset the button state to idle
// isidle(), iswaitpress(), iswaitrelease(), iskeyready(): get the button state
class ss_button:public statemachine
{
protected:
enum keystates{idle,waitpress,waitnobounce,waitrelease,keyready};
int uppin,downpin;
int u,d;
char key;
char tempkey;
char prevtempkey;
int holdcounter;
char readkey()
{
int u = !digitalRead(uppin);
int d = !digitalRead(downpin);
if(u)
{
return ‘u’;
}
else if(d)
{
return ‘d’;
}
else
return 0;
}
void run()
{
switch(state)
{
case idle:
{
break;
}
case waitpress:
{
tempkey = readkey();
if(tempkey!=0)
{
prevtempkey = tempkey;
state = waitnobounce;
holdcounter=0;
}
break;
}
case waitnobounce:
{
tempkey=readkey();
if(tempkey==0) //bounces to no keypress
{
state = waitpress;
}
else if(tempkey==prevtempkey)
{
holdcounter++;
if(holdcounter>5)
state=waitrelease;
}
else
{
prevtempkey=tempkey;
holdcounter = 0;
}
break;
}
case waitrelease:
{
if(readkey()==0) //has been released
{
key = prevtempkey;
state = keyready;
}
break;
}
}
}
public:
ss_button():statemachine(10){} //set the run interval in the constructor
int getstate()
{
return state;
}
void reset() //reset to idle state
{
state=idle;
key = 0;
}
void startwaitkey() //start wait keypress, change the state from idle to statewaitkeypress
{
if((state==idle)||(state==keyready))
state = waitpress;
}
char getkey() //return the key, change the state from keyready to idle
{
if(state==keyready)
{
state = idle;
return key;
}
return 0;
}
byte iskeyready()
{
if(state==keyready)
return 1;
else return 0;
}
byte iswaitrelease()
{
if(state==waitrelease)
return 1;
else return 0;
}
byte iswaitpress()
{
if(state==waitpress)
return 1;
else return 0;
}
byte isidle()
{
if(state==idle)
return 1;
else return 0;
}
void setup(int pin_up,int pin_down)
{
uppin = pin_up;
downpin = pin_down;
pinMode(uppin,INPUT_PULLUP);
pinMode(downpin,INPUT_PULLUP);
state = idle;
}
};
ss_button button;
[/cc]
Source Code 6. Button Reading Module
G(g). Menu Controller Module Implementation
Menu controller can be seen as the main program by the user of the soldering station system. At normal usage, the state of the menu controller module would mostly be waiting a key press while all other modules are running together continuously to control the soldering iron temperature. If a key-press input is detected then the menu controller would run specific function such as editing the set point or something else. The program listing is shown in the Source Code 7.
[cc language=”cpp”]
//#########################################################################################
// CLASS: ss_menu
class ss_menu:public statemachine
{
protected:
enum states{start,waitkey,showsetpoint,editsetpoint};
int showsetcounter;
int seteditcounter;
void run()
{
switch(state)
{
case start:
{
button.reset();
button.startwaitkey(); //wait the first keypess
ssdisplay.setActualChannel();
state = waitkey;
break;
}
case waitkey:
{
if(button.iskeyready()) //first keypress
{
button.reset();//reset key state
ssdisplay.setSetpointChannel();
state = showsetpoint;
showsetcounter=0;
setpointedit = setpoint;
}
break;
}
case showsetpoint:
{
showsetcounter++;
//start waitkey for edit
if(button.isidle())
{
button.startwaitkey();
}
else if(button.iskeyready())
{
state = editsetpoint;
ssdisplay.setEditChannel();
setpointedit = setpoint;
seteditcounter = 0;
}
else //no keypress in 2 seconds
{
if(showsetcounter>20)
{
button.reset();
state = start;
}
}
break;
}
case editsetpoint:
{
seteditcounter++;
if(button.iskeyready())
{
char k = button.getkey();
if(k==’u’)
setpointedit += 50;
if(k==’d’)
setpointedit -= 50;
if(setpointedit>450) setpointedit = 450;
if(setpointedit<100) setpointedit = 100;
button.startwaitkey();
seteditcounter = 0;
}
else if(button.iswaitrelease())
{
seteditcounter = 0;
}
else
{
if(seteditcounter>20)
{
if(setpointedit!=setpoint)
setpoint = setpointedit;
button.reset();
state = start;
ssdisplay.setActualChannel();
}
}
break;
}
}
}
public:
ss_menu():statemachine(100){} //set the run interval in the constructor
void setup()
{
showsetcounter = 0;
seteditcounter = 0;
setpoint = 250;
state = showsetpoint;
}
};
ss_menu menu;
[/cc]
Source Code 7. Menu Controller Module
At setup, this module set the temperature setpoint as 250 ºC. This simple initialization is done only for the simplicity of an example code. In the real application, it should read the saved value (in the microcontroller’s flash/EEPROM) which is recorded to retain the last setting after the power-off. The initial state of this module is set as “showsetpoint”, which is programmed to display the setpoint value and wait the next button press within 2 second. If there’s no dtected button-press, then it will change its state to “start” to switch the display channel for displaying actual temperature and enter “waiting key” state.
The main design of the menu is that it will let the system run the temperature controller do its job while the menu is waiting a button-press. If a button-press is detected, then it changes the state to show the setpoint setting without modifying (incrementing or decrementing the setpoint). It is important not to do anything but only show the active setpoint since before pressing the button at the first time, the user only see the actual temperature and might have no idea about what the current setpoint value is. If the user is then press the button again (up/down) within a specified period (2 seconds) then the menu controller would change the state to “editsetpoint” and show the edited value cahnges in the display (by setting up the proper channel of the display module). At this point, the actual setpoint should never be update since the user might change his/her mind to increment or decrement back to its previous value. The edited setpoint value should be used to update the actual setpoint only if the user has finished the editing and the edited value is different from the actual setpoint. In this editing state, the system know whether the user has finished editing or not by measuring the key-waiting period. If there’s no button-press within 2 seconds then the user would be considered has finished the setpoint editing.
G(h). Running The Whole Modules
To run the complete soldering station system, just integrate all module codes (Source Code 1-7) into one Arduino sketch and add setup() and loop() as shown in the Source Code 8 (Just copy and paste all previous codes on top of it). Now you can compile and run with right board setting. It has been successfully tested on Arduino ATMEGA8 and Arduino Duemilanove ATMEGA328.
[cc language=”cpp”]
void setup()
{
menu.setup();
button.setup(15,14);
ssdisplay.setup(6,5,4,7,8,9,10,11,12,13);
sensor.setup(2,0);
controller.setup();
heater.setup(3);
}
void loop()
{
menu.execute();
button.execute();
ssdisplay.execute();
sensor.execute();
controller.execute();
heater.execute();
}
[/cc]
Source Code 8. Setup and Loop for Soldering Station Controller System
H. Advanced Soldering Station Program for ATMEGA8 Microcontroller
We have developed an embedded controller for this soldering station, which is implemented using ATMEGA8 microcontroller, programmed with lock protection to disable the chip for being read or modified. It runs on 8MHz internal factory calibrated RC clock, so there is no need to provide XTAL and its related capacitors. The operational menu, custom sensor calibration initialization, and control parameter can be customized for general controller supporting many heater cartridges with various sensor types, as well as for special controller (of your own brand) to work specifically with your supplied cartridge only. Get more information about this product here.