Digital Control for Laboratory Power Supply Using Arduino
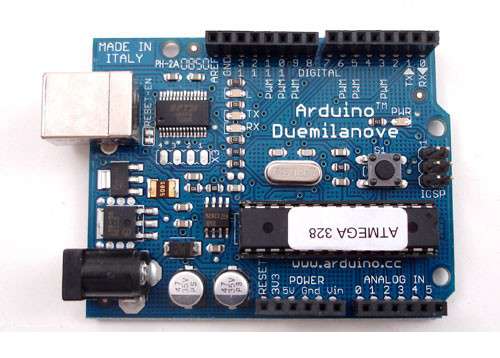
Figure 1. Arduino Duemilanove Board for Power Supply’s Digital Control
Digital System for Display and Control
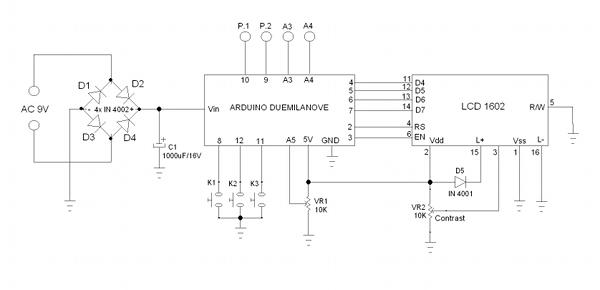
As the second part of the first article Adjustable 1-30V Laboratory Power Supply, the digital control and display for our power supply will be presented here. The microcontroller used in the circuit is ATMEGA 328, a member of Atmel’s AVR microcontroller family. We use Arduino Duemilanove board to ease the development, and you can see the board in the Figure 1. If you don’t want to use Arduino board then you can make your own microcontroller board based on Arduino system configuration at arduino-duemilanove-schematic.pdf (you can omit many parts which is not needed for this design). Here is the circuit’s schematic diagram employing the Arduino board:
Figure 2. Shcematic Diagram of The Digital Control Circuit
The Control and Display Circuit Design
The main features of the power supply are the adjustable output voltage level and the adjustable current limiter. We need a control interface to set the parameters, and a display to monitor the real value of the controlled parameter. At the schematic diagram we can see the control interface consists of three key switches and one potentiometer. The key switches is read by digital input pin of the micro controller board, and the potentiometer is read by the analog input of the board. The potentiometer position can be used to adjust the voltage or current level, even to select multiple option of menu items, unlimited usage can be applied. The key switches has no debounching capacitors, so we have to provide the debounching mechanism in the software. This controller communicate to the switching regulator circuit using PWM signal (P.1 and P.2) to adjust the voltage and current setting, and read the analog voltages (A3 and A4) from current sensor and voltage sensor from switching regulator board to monitor the actual voltage and current. The potentiometer labelled as contrast is not part of the user interface since it should be set only one to adjust the readability of the LCD monitor.
The Program Source Code (The Firmware)
The source code for the arduino system is shown below, how the code works and how to tweak this firmware will be presented in the next update, coming soon!
#include <LiquidCrystal.h>

#include <stdlib.h>
LiquidCrystal lcd(2,3,4,5,6,7);
int voltagePin = A3;
int currentPin = A4;
int pwmCurrentPin = 10;
int pwmVoltagePin = 9;
int potPin = A5;
int key1Pin = 8;
int key2Pin = 12;
int key3Pin = 11;
int prevk1=1;
int prevk2=1;
int prevk3=1;
int currk1=1;
int currk2=1;
int currk3=1;
float voltageRef = 0;
float currentRef = 0;
float readVoltage()
{
float total=0;
for(int n=0;n<100;n++)
{
float temp = (float) analogRead(voltagePin);
temp = 1.1 * temp/1024 * 30;
total = total + temp;
delay(1);
}
return total/100;
}
float readCurrent()
{
float total=0;
for(int n=0;n<100;n++)
{
float temp = (float) analogRead(currentPin);
temp = temp/1024 * 5;
temp = (temp-2.51)*25*0.185;
total = total + temp;
delay(1);
}
return total/100;
}
float readPot()
{
float temp = (float) analogRead(potPin);
temp = temp/1024;
return temp;
}
void showCurrentSet(float value)
{
char txt[6];
dtostrf(value,4,1,txt);
lcd.setCursor(11,0);
lcd.print(txt);
}
void showVoltageSet(float value)
{
char txt[6];
dtostrf(value,5,1,txt);
lcd.setCursor(4,0);
lcd.print(txt);
}
void showVoltageAct(float value)
{
char txt[6];
dtostrf(value,5,1,txt);
lcd.setCursor(4,1);
lcd.print(txt);
}
void showCurrentAct(float value)
{
char txt[6];
dtostrf(value,4,1,txt);
lcd.setCursor(11,1);
lcd.print(txt);
}
void setup()
{
lcd.begin(16, 2);
lcd.setCursor(0,0);
lcd.print(“SET:00.00V 0.00A”);
lcd.setCursor(0,1);
lcd.print(“ACT:00.00V 0.00A”);
pinMode(key1Pin, INPUT_PULLUP);
pinMode(key2Pin, INPUT_PULLUP);
pinMode(key3Pin, INPUT_PULLUP);
pinMode(pwmVoltagePin, OUTPUT);
analogWrite(pwmVoltagePin, 0);
pinMode(pwmCurrentPin, OUTPUT);
currentRef = 0.5;
analogWrite(pwmCurrentPin,128 + (currentRef*12.7));
}
void loop()
{
int tempk1 = digitalRead(key1Pin);
int tempk2 = digitalRead(key2Pin);
int tempk3 = digitalRead(key3Pin);
int count = 0;
while (count < 10)
{
currk1 = digitalRead(key1Pin);
currk2 = digitalRead(key2Pin);
currk3 = digitalRead(key3Pin);
if(tempk1 != currk1)
{
tempk1 = currk1;
count = 0;
}
if(tempk2 != currk2)
{
tempk2 = currk2;
count = 0;
}
if(tempk3 != currk3)
{
tempk3 = currk3;
count = 0;
}
count++;
}
if((currk1==0)&&(prevk1==1))
{
currentRef = currentRef + 0.5;
if(currentRef>3) currentRef=3;
showCurrentSet(currentRef);
analogWrite(pwmCurrentPin,128 + (currentRef*11));
}
if((currk2==0)&&(prevk2==1))
{
currentRef = currentRef – 0.5;
if(currentRef<0.5) currentRef=0.5;
showCurrentSet(currentRef);
analogWrite(pwmCurrentPin,128 + (currentRef*12.7));
}
if((currk3==0)&&(prevk3==1))
{
}
prevk1=currk1;
prevk2=currk2;
prevk3=currk3;
showVoltageAct(readVoltage());
showCurrentAct(readCurrent());
showCurrentSet(currentRef);
showVoltageSet(readPot()*30);
analogWrite(pwmVoltagePin, 0.91*readPot()*255);
}
See the software in action, in our Youtube channel below:


I must share it. It is working, you shorted p&minus output, that means it has some protection.
Show the full schematic or of the PSU sir.
Good and great work. Well done.
Please, I like to use Atmega 328 nano, with oled 0.96 4pin,128by64 chip: 1306
OR
TZT TFT Display 0.96 / 1.3 inch IPS 7P SPI HD 65K Full Color LCD Module ST7735 Drive IC 80*160 (Not OLED) For Arduino
QUESTION: HOW DO I MODIFY THE CIRCUIT AND .INOSFTWARE FILE HERE? HELP!!
#include
#include
LiquidCrystal lcd(2,3,4,5,6,7);
int voltagePin = A3;
int currentPin = A4;
int pwmCurrentPin = 10;
int pwmVoltagePin = 9;
int potPin = A5;
int key1Pin = 8;
int key2Pin = 12;
int key3Pin = 11;
int prevk1=1;
int prevk2=1;
int prevk3=1;
int currk1=1;
int currk2=1;
int currk3=1;
float voltageRef = 0;
float currentRef = 0;
float readVoltage()
{
float total=0;
for(int n=0;n<100;n++)
{
float temp = (float) analogRead(voltagePin);
temp = 1.1 * temp/1024 * 30;
total = total + temp;
delay(1);
}
return total/100;
}
float readCurrent()
{
float total=0;
for(int n=0;n<100;n++)
{
float temp = (float) analogRead(currentPin);
temp = temp/1024 * 5;
temp = (temp-2.51)*25*0.185;
total = total + temp;
delay(1);
}
return total/100;
}
float readPot()
{
float temp = (float) analogRead(potPin);
temp = temp/1024;
return temp;
}
void showCurrentSet(float value)
{
char txt[6];
dtostrf(value,4,1,txt);
lcd.setCursor(11,0);
lcd.print(txt);
}
void showVoltageSet(float value)
{
char txt[6];
dtostrf(value,5,1,txt);
lcd.setCursor(4,0);
lcd.print(txt);
}
void showVoltageAct(float value)
{
char txt[6];
dtostrf(value,5,1,txt);
lcd.setCursor(4,1);
lcd.print(txt);
}
void showCurrentAct(float value)
{
char txt[6];
dtostrf(value,4,1,txt);
lcd.setCursor(11,1);
lcd.print(txt);
}
void setup()
{
lcd.begin(16, 2);
lcd.setCursor(0,0);
lcd.print(“SET:00.00V 0.00A”);
lcd.setCursor(0,1);
lcd.print(“ACT:00.00V 0.00A”);
pinMode(key1Pin, INPUT_PULLUP);
pinMode(key2Pin, INPUT_PULLUP);
pinMode(key3Pin, INPUT_PULLUP);
pinMode(pwmVoltagePin, OUTPUT);
analogWrite(pwmVoltagePin, 0);
pinMode(pwmCurrentPin, OUTPUT);
currentRef = 0.5;
analogWrite(pwmCurrentPin,128 + (currentRef*12.7));
}
void loop()
{
int tempk1 = digitalRead(key1Pin);
int tempk2 = digitalRead(key2Pin);
int tempk3 = digitalRead(key3Pin);
int count = 0;
while (count 3) currentRef=3;
showCurrentSet(currentRef);
analogWrite(pwmCurrentPin,128 + (currentRef*11));
}
if((currk2==0)&&(prevk2==1))
{
currentRef = currentRef – 0.5;
if(currentRef<0.5) currentRef=0.5;
showCurrentSet(currentRef);
analogWrite(pwmCurrentPin,128 + (currentRef*12.7));
}
if((currk3==0)&&(prevk3==1))
{
}
prevk1=currk1;
prevk2=currk2;
prevk3=currk3;
showVoltageAct(readVoltage());
showCurrentAct(readCurrent());
showCurrentSet(currentRef);
showVoltageSet(readPot()*30);
analogWrite(pwmVoltagePin, 0.91*readPot()*255);
}
See the software in action,